

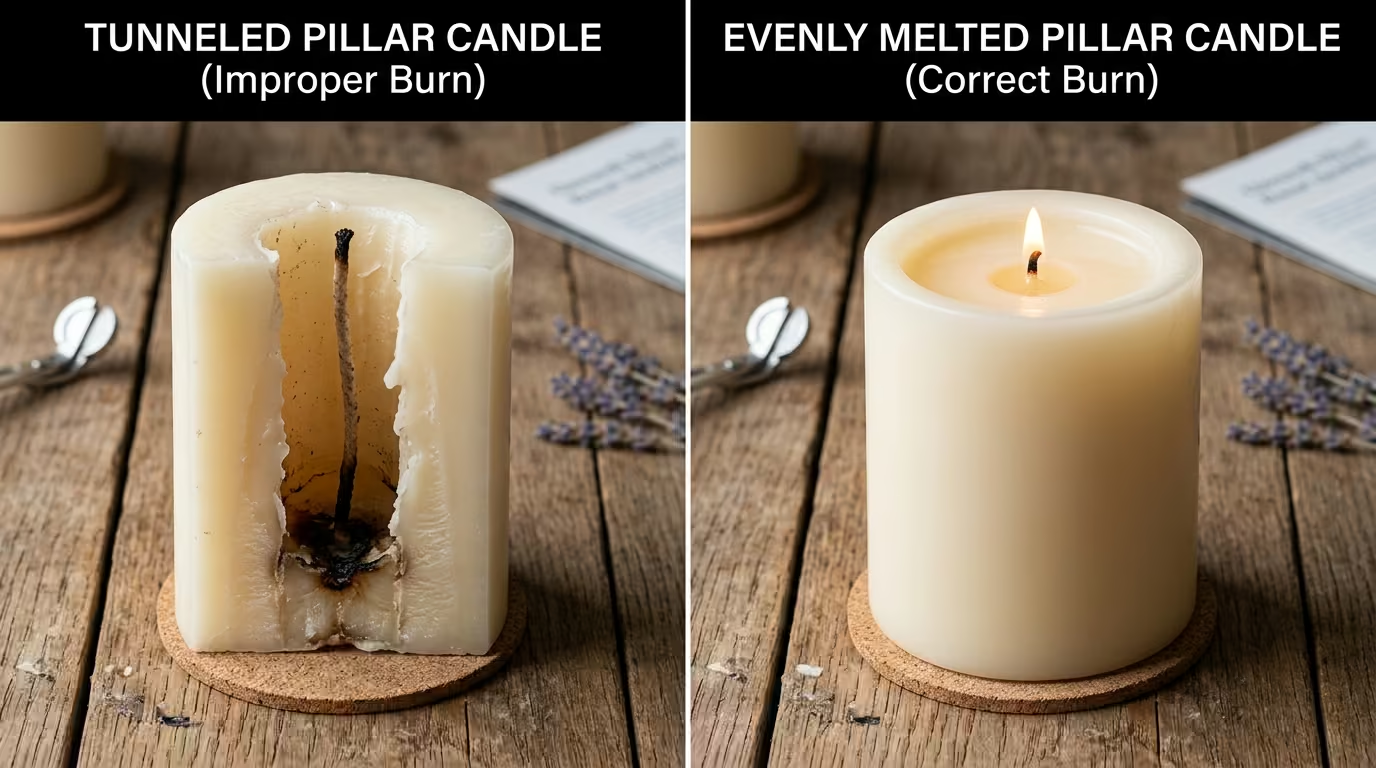
There is nothing more disappointing than a pillar candle with a deep valley carved down its middle. The outside edges stand tall, untouched, while the flame huddles at the bottom of a hole it cannot climb out of. Half the wax is stranded, and the candle looks ruined after only a few burns.
That valley has a name: tunnelling. It is the most common candle complaint in the world, and also the most fixable. Once you understand why it happens, stop candle tunnelling becomes a simple matter of technique. This guide explains the cause, the cure, and the habits that keep every pillar you own burning flat to the very end. The related pillar candle size guide explains how room scale affects the best pillar choice.
Why Pillar Candles Tunnel
A candle flames best when the whole top surface melts evenly. Tunnelling happens when the flame melts only the centre while the outer rim stays solid. The flame then sinks below the rim, sheltered from the air, and can only melt inward, digging the tunnel deeper with every burn.
The Root Cause Is the First Burn
Nearly every tunnel begins on night one. If the candle is blown out before the melt pool spreads edge to edge, the rim pencils in hard. On the next lighting, the flame starts inside that cold shell and the process repeats. One short first session can condemn a candle for life, which is why experienced buyers treat the first burn as sacred. This connects closely with our guide on Are Aromatherapy Candles Safe During Pregnancy?.
Secondary Causes Worth Knowing
Even with a perfect first burn, other habits cause tunnels. Burning in a draught tilts the flame so it melts one side more than the other. Skipping wick trims makes the flame tall and narrow, scooping out a hole instead of melting wide. Small brims and wide jars tunnel more easily too, because the outer wax sits further from the flame’s heat zone.
The Golden Rule: The First Burn Decides Everything
The single most reliable way to stop candle tunnelling is to control the first lighting. On the very first burn, let the candle run long enough for the entire top surface to melt into a single liquid pool, right out to the rim. For a 60–80mm pillar, that usually takes one to two hours. For a large 80x250mm pillar, allow closer to three.
What a Full Melt Pool Looks Like
When a candle is burning correctly, the whole flat top ripples with liquid wax. You should see no hard rim at the edge, no ring of unmelted wax around the puddle. That full, even pool is the foundation for every subsequent burn. Once the wax is liquid across the full diameter, the tunnel simply cannot form.
How Long the First Burn Takes
The time depends on size and room warmth. Small pillars of 50–60mm may pool fully in under an hour. Tall or wide pillars need up to three. Sit with the candle through this first session, or time it, because blowing out early is the exact mistake you are trying to avoid. The four-hour safety limit from fire guidance gives you comfortable room to finish the job.
The Supporting Habits That Prevent Tunnelling
A perfect first burn works best when every other habit supports it. Wick care, calm air, and even sessions all feed into whether a pillar burns flat or valleys. Nail these and tunnelling becomes rare rather than routine.
- Trim the wick to six millimetres before every burn so the flame stays even and compact.
- Keep candles out of draughts, away from windows, vents, and doors in active use.
- Give each session at least one to two hours unless the pool is clearly full earlier.
- Let wax re-harden between burns; firing up a half-liquid candle wastes the pool.
- Rotate or reposition candles on uneven surfaces so gravity does not tip the melt.
- Use a flat, level holder so the pool stays symmetrical instead of pooling to one side.
Wick Length and Flame Shape
A flame is a heat source shaped like a teardrop. The length of the wick controls how tall that teardrop is. A tall flame concentrates heat in a narrow column, which digs a hole. A trimmed wick creates a short, wide flame that heats more of the surface. That is why trimming and tunnelling are best friends: fix one and the other improves.
Drafts and the Leaning Flame
A draught leans the flame sideways, melting one wall of wax while the far side stays cold. Lopsided melt pools harden into sloped rims, which also strand wax. If you notice a candle burning down one side, rescue it immediately: blow it out, let it cool, and reposition it in stiller air before relighting.
Fixing a Candle That Has Already Tunnelled
Tunnelled candles are salvageable, and the fix does not need surgery. You cannot easily add burn life back, but you can flatten the wax and give the candle a second chance. The most reliable method is the foil wrap.
The Foil Wrap Method
Tear a piece of aluminium foil long enough to wrap the candle loosely, and form a ring that sits around the flame, standing just above the wick. The foil traps heat and reflects it inward, forcing the rim to melt. Light the candle and let it run until the pool reaches the edges inside the foil. Remove the paper once the surface has flattened and you have restored an even burn.
When to Give Up and Relight Strategy
If a candle is already deep, the foil method may still leave a crater on later burns. Continue trimming and using the full-session habit, and the pool will gradually recover. For badly ruined candles, use the leftover wax in a wax melter or repurpose it. Our guide to reusing old candle jars and leftover wax turns stranded wax into new candles rather than waste.
Matching Your Burn Sessions to the Candle
Pillar candles punish short burns because of their wide surface. If you like brief evening sessions, choose a narrower candle whose surface pools quickly. A 50–60mm pillar reaches a full pool faster than an 80mm one, so it suits short rituals. Wide pillars reward patient evenings and long hosting sessions.
Plan the Candle Around Your Evenings
Look at how you actually burn candles. If most nights are thirty minutes after dinner, buy slimmer pillars. If you host long dinners at weekends, wide pillars will thank you. This simple match between candle size and session length prevents more tunnelling than any technique, because a candle that finishes pooling before you blow it out never tunnels.
Fix a Shallow Tunnel Early
Give the Melt Pool Time
A shallow tunnel is often recoverable when the candle still has a strong outer wall. The next burn should last long enough for the melt pool to move close to the edge. The candle must remain attended throughout. Short burns only deepen the hole. Longer, calm burns help the wax surface reset before the problem becomes too deep to correct. Our large & pillar candles range has more choices along these lines.
Choose a Supportive Size
The candle’s diameter also affects how quickly a tunnel becomes visible. A wide pillar needs a correctly sized wick and a longer first burn. The large pillar candle collection collection is useful when a room needs a substantial pillar with enough surface area for a stable display. The holder or tray should still protect the furniture from heat and drips.
Frequently Asked Questions
What causes a candle to tunnel?
Tunnelling happens when the flame melts only the middle of the candle while the outer rim stays solid. The flame sinks into the hole and cannot reach the edges again. The usual cause is a first burn that was too short to melt the full surface.
Can I fix a candle that has already tunnelled?
Yes. Wrap a ring of aluminium foil around the candle, just above the rim, to trap heat and melt the edges. Let it burn until the surface wides out, then check after each subsequent session. The candle will not recover its lost burn time, but it will burn evenly from then on.
How long should I burn a pillar candle the first time?
Until the entire top is a liquid pool reaching the rim. Small pillars take around one hour, medium ones one to two hours, and large pillars closer to three. Never blow it out before the melt pool wides out fully, or the tunnel pattern is set.
Does wick trimming stop tunnelling?
It helps significantly. A short, clean wick creates a wide, even flame instead of a tall scooping one. Trim to about six millimetres before every burn, and make sure the first burn melts the full surface. Together these two habits prevent most tunnelling.
Why does my candle burn down one side?
A draught is the usual culprit. Moving air leans the flame, melting one wall of the candle while the other stays cold. Blow the candle out, move it to stiller air, and reposition it level before relighting.
Do all candles tunnel equally?
No. Wide candles tunnel most easily because their outer wax sits far from the flame’s heat. Narrow pillars, tapers, and tealights tunnel rarely. Pillar candle size and your session length should be matched so the melt pool reaches the rim before you finish burning.
Is a tunnelled candle dangerous?
Not usually. A tunnel simply wastes wax and shortens the useful life of the candle. It becomes a fire concern only if the flame is hidden by tall walls and the wick grows long and unstable, so trim the wick and keep the candle on a flat, safe surface.
Where can I find pillar candles that burn evenly?
Quality large pillar candles in the size that matches your evening habits are the surest cure. Browse the large pillar candles collection at Christmas Candles UK, where the classic paraffin pillars are designed to burn flat with a proper first session.
Conclusion
Stop candle tunnelling is mostly a matter of one heroic first burn and a short wick routine. Let the first session widen the pool to the rim, keep the trim at six millimetres, and match candle width to how long you actually light candles. Tunnels come from short primaries, not from bad candles.
If a pillar already has a valley, the foil fix will rescue it. And next time, choose the right size for your evenings from the start. Explore large pillar candles at Christmas Candles UK and start every candle the way it deserves.