
Every candle maker remembers the first mould decision. You scroll through cylinders, spheres, skulls, fruit, and pineapples, and every one looks fun to pour. Then you pick the most exciting shape and discover that a detailed novelty mould is the hardest thing a beginner can attempt.
The smart route is boring on purpose. The best first candle mould is a simple shape that releases easily, wicks comfortably, and lets you learn the craft without fighting the mould itself. This guide ranks the classic starting shapes, explains why detail is a trap for beginners, and helps you pick the one that will actually succeed. The related silicone versus plastic mould guide adds a clear material comparison for beginners.
Why Beginners Should Start Simple
A first candle is a lesson in pouring temperature, cooling, and release. Every extra detail on the mould adds difficulty to all three steps. A textured skull or layered pineapple demands perfect pouring, careful cooling, and a release that highlights every missed air bubble. Simple shapes forgive those mistakes. This connects closely with our guide on How to Make Your Own Pillar Candle From Scratch.
The Joy of the Quick Win
Starting with a clean cylinder or taper gives you a successful candle within a single session. That quick win builds the confidence to keep making. Many hobbyists quit in week one because a fancy mould failed; nobody quits after a perfect plain pillar. Momentum matters more than the wow factor at the start.
Learning the Fundamentals
The fundamentals you need to master first are wax temperature, wick centring, and cooling speed. All three are easier to control in a smooth, straight mould. Once those habits are automatic, the ornate shapes become achievable projects rather than demoralising traps.
The Four Classic Starter Shapes
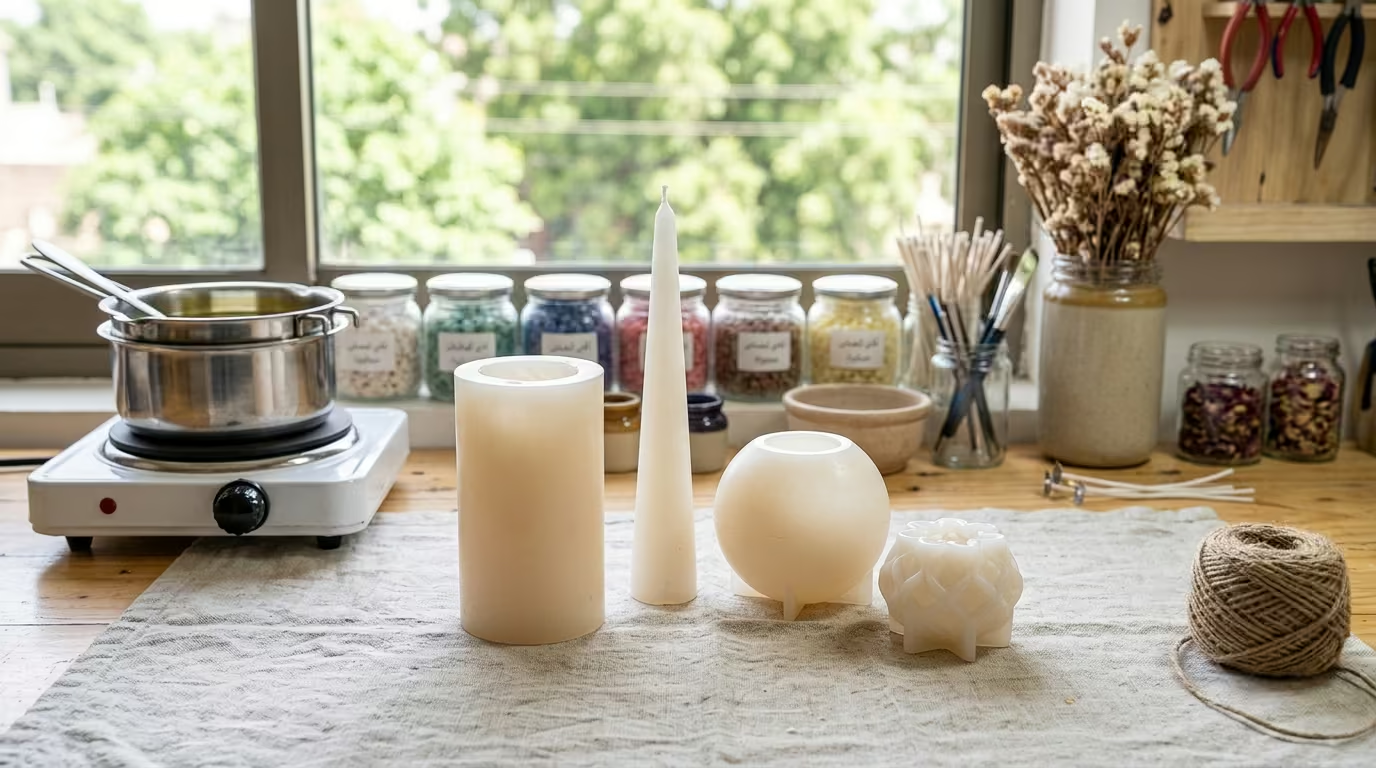
Some shapes have served candle makers for centuries because they work. Compare these four on beginner-friendliness and you will see a clear order. Pick anything on this list and your first sessions will feel rewarding rather than frustrating.
- Straight cylinder: The easiest pour, wick and release. Best first choice.
- Tapered cone: Clean lines and steady wicking. Nearly as simple as a cylinder.
- Sphere or ball: Interesting but requires careful two-part wicking.
- Sculpted or textured shape: High detail, high risk. Save for round two.
The Straight Cylinder
A straight-sided pillar mould is the closest thing candle making has to training wheels. It has no narrow throat, no deep undercut, and no texture to hide bubbles. Wax pours easily, the wick centres without gymnastics, and the finished candle slides free with a gentle tap. Start here and you learn timing, not trickery.
The Tapered Cone
A tapered cone narrows toward one end, which gives the candle an elegant profile while still releasing simply. Because the base is the wide end, the candle slides out in the direction of least friction. Cone shapes also sit beautifully in the candle holders collection, so your first taper pairs naturally with a real base. It is the choice for makers who want a daintier result than a full cylinder.
The Sphere and Beyond
Spheres and novelty shapes force you to centre the wick in three dimensions, which takes practice. Save them for after you have produced a handful of clean cylinders. When you do graduate to detail, remember silicone flexes best: sculpted shapes release far more smoothly in flexible moulds, one reason the Candles Moulds range at Christmas Candles UK stocks detail-heavy designs in silicone.
Matching Mould Size to Your First Project
Beginners also misjudge size. A small mould finishes quickly and uses little wax, which means cheap practice. A huge mould burns more wax, cures slower, and magnifies every mistake. Start small, master the technique, and only then scale up. A modest 50–60mm pillar or taper is the perfect classroom.
The Wax Budget Reality
Every failed pour costs wax, fragrance, and wick. Starting small keeps those costs to pocket money. When you are confident, the cost of experimenting rises, but by then the failure rate drops. Choose a mould that fits your patience and your wallet, and both will stretch further.
Detail Level and Release Difficulty
The number of crevices in a mould predicts its difficulty. Each ridge, limb, and fold can trap air or hold a candle fast. Beginners should count the crisp lines on a mould and step away from anything with more than a smooth curve. Clean edges, deep simple shape, and one axis of release are the three markers of a beginner-friendly mould.
Preparing Your Chosen Mould Before the First Pour
Choosing the shape is the first step; preparing it is the second. A clean, dry mould releases better and shows off the finished candle. Warm the mould gently before pouring to slow the cooling, which reduces bubbles and imperfections that beginners always battle.
Controllable Cooling
The cooling stage decides more of your success than the pour itself. Slow, even cooling at room temperature stops cracks and sinkholes. Fast cooling, like refrigerating, stresses the wax. Plan your first pour for a calm evening when the mould can sit undisturbed and cool naturally through the night.
Wicking With the Shape in Mind
Centre the wick through the mould’s natural axis and hold it straight with a wick tab or a simple taping system. For a cylinder, that is a vertical line top to bottom. For a cone, the wick still runs straight through the middle. Practise centring on a simple shape so the muscle memory transfers to complex ones later.
Start With a Forgiving Shape
Keep the First Pour Simple
A first mould should make success easy to repeat. A straight cylinder has few hidden corners and releases without much pressure. The maker can then focus on centring the wick, measuring wax, and controlling temperature. Novelty shapes look exciting, but their thin points and deep details can expose every small mistake. Simple progress builds useful confidence faster.
Move to Detail in Stages
After one or two clean pours, the maker can add curves, relief, or a more unusual profile. A plastic taper candle mould works well for learning how a narrow cavity supports a wick. The project should remain easy to hold and burn safely. Detail matters, but a stable flame and sound base matter more. You will find the full selection in our candle moulds range.
Frequently Asked Questions
What is the easiest candle mould shape for a beginner?
A straight-sided cylinder is the easiest. It pours, wicks, and releases with the least friction, and it hides fewer mistakes than detailed shapes. Choose a small cylinder first to learn timing and temperature, then branch out to tapers and spheres.
Should I buy a silicone or plastic mould as my first one?
Start with whichever matches your chosen shape. Silicone suits curves and detail because it flexes on release. Plastic suits straight pillars and tapers because it flatters crisp edges. Many beginners buy one of each and discover their preference within the first few pours.
Why did my novelty candle mould fail on the first try?
Novelty shapes combine deep detail, tight corners, and awkward wicking. Air pockets, cracking, and stuck centres are common on the first pour. Start with smooth shapes, master the basics, and revisit novelty moulds once your technique is reliable.
How big should my first candle be?
Keep it small. A candle around 50–60mm wide uses little wax, cures quickly, and keeps failed attempts cheap. Once you have several clean pours behind you, move up to larger pillars that reward the extra wax budget.
What is the trick to releasing a candle from a mould?
Let the candle cool fully, then tap the mould sides to break any seal. For rigid plastic, a light release spray helps; for silicone, flex and peel gently. Never rush the release, since warm candles bend, dent, and stick halfway out.
Can I reuse the same mould for many candles?
Yes, with care. Wash moulds in warm soapy water, dry them fully, and store them away from sharp tools and sunlight. Silicone and quality plastic both last for years of reuse, which is why they are the economical choice for regular makers.
Do I need a different mould for scented candles?
No. Scented candles pour into the same moulds with the same technique. The fragrance oil changes the pouring temperature slightly, so always follow the recommended pour range for your wax. Silicone and plastic handle scented wax equally well.
Where can I see beginner mould options?
The candles moulds range at Christmas Candles UK carries cylinders, tapers, spheres, and sculpted designs so you can compare shapes before buying. Smooth starter moulds sit alongside detail-heavy silicone designs for when you are ready to level up.
Conclusion
The best first candle mould shape is the one that gives you a clean win on day one. Start with a small straight cylinder or elegant taper, keep the wax budget small, and let yourself master timing and wicking before reaching for texture and novelty. Every pro began exactly where you are now.
Pick a simple shape that reflects a candle you would actually burn, pour it calmly, and enjoy the first complete release. Browse the candles moulds range at Christmas Candles UK to find the starter shape that sets your craft up for success.